Manifest Technology Blog
-- Site:
| Articles
| Galleries
| Resources
| DVI Tech
| About
| Site Map
|
Articles:
| PC Video
| Web Media
| DVD & CD
| Portable Media
| Digital Imaging
| Wireless Media
| Home Media
| Tech & Society
|
PC Video: |
PC Video Articles |
Video Software Gallery |
Video Editing Resources |
Getting Started with Video Editing
with Adobe Premiere Elements (12/2004)
by Douglas Dixon
Getting Started
Adobe Gets Elementary
Still the Premiere
Import and Capture
Editing
Effects
Export and DVD
Elementary
References
While DV camcorders and more powerful computers have made editing video more
accessible to a wider audience, just getting started with video also can be
confusing because of the wide range of choices among today's video editing
software products. You could start with one of the entry-level consumer tools at
under $100, and have fun making short productions using the built-in wizards and
templates. But what if you then want to get more involved video editing, whether
because you are training students, or want to edit your own corporate
presentations or music videos? Wouldn't it would make more sense to start out at
the beginning with a deeper tool that could grow with you, instead of having to
break some old habits and learn new techniques when you start over?
 Adobe Premiere Elements
This explains Adobe's approach with the new Adobe Premiere Elements (www.adobe.com/products/premiereel),
released in September 2004 in the same entry-level price range ($99 MSRP). This
is not just a stripped-down version of the full-up Premiere Pro (at $699).
Instead, like Photoshop Elements, this is actually a significantly enhanced
version of the professional product, adding templates, intelligent defaults,
just-in-time how-to instructions, and built-in DVD authoring that allow you to
get started easily, and still have the power of the Premiere engine humming
under the hood when you're ready to shift into high gear.
If you're interested in dabbling with video editing to see what it's like,
and have fun making short productions, then you can happily get started with the
free tools bundled with your system: iMovie on the Mac and Windows
Movie Maker on PCs. Or you can do a bit more with widely-distributed Windows
consumer products like Pinnacle Studio, Roxio VideoWave, Sony
Vegas Movie Studio, and Ulead VideoStudio (at under $100).
These tools typically help simplify the editing process by providing a
storyboard interface, so you just need to arrange thumbnails of clips and then
they provide the basics for adding a music track, plus titles, plus basic
transitions and effects. The result is a friendly, but ultimately constrained,
sandbox. These applications are great for easy and occasional quick assembling
of clips, but they are something of a detour if you have aspirations to do more
with your editing,
But getting started with professional tools is not necessarily appetizing
either, both because of their intimidating complexity to new users, and the
significantly higher cost for applications like Apple Final Cut Pro
($999), Adobe Premiere Pro, Avid Express DV, Pinnacle Edition,
Sony Vegas, or Ulead MediaStudio Pro (around $500 - $700). Apple
attacked this gap with Final Cut Pro Express, stripped down for DV
editing at $299, and Avid even offers Avid Free DV as a free download,
providing an introduction to the Avid interface, but limited to two streams.
Which brings us to Adobe's different approach for its Photoshop Elements
and Premiere Elements products (also available bundled together for
$149). These applications start with the same high-powered engine and same base
workflow of the professional products, remove some ludicrously complex high-end
features not required by normal humans, and then enhance the interface by tuning
it to assist new (and casual) users.
The result is not a crippled or dumbed-down street version of the original
world-class race car, but instead is a luxury vehicle for the masses that both
provides convenient transportation, with more power under the hood available
when you need to open it up. The added interface elements provide quick and
natural access for providing basic, common functions, and yet the real
application is still right there as you grow and do more.
For example, the underlying Premiere Pro engine "conforms" imported
audio clips if needed to the project's audio sample rate, which means audio can
be processed and previewed at high quality and in real time. Under the hood,
Premiere makes processed copies of any such clips in the background while you
work, which can be confusing when your newly imported audio is still being
processed.
As soon as you fire up Premiere Elements you can see how Adobe has tweaked
the interface and user experience throughout the application to make it more
accessible.
The initial Welcome screen still prompts you to open an existing
project or start a new project, but now also offers the option to just
immediately start capturing video clips. To help you get started, it also offers
step-by-step tutorials using a pre-built project. Behind the scenes, Premiere
Elements also makes intelligent default decisions for you, so there is no
confusing prompt as in Premiere Pro to choose the project preset (i.e., DV -
NTSC is assumed for American systems). You can still define custom DV presets
(but not Video for Windows as in Premiere Pro).
Once you open the project, you can see that the Premiere Elements windows
have been redesigned in a similar way. The main window now has a task bar with
larger icons for key functions: Open and Save projects, Add Media to projects,
and Undo / Redo. This ability to experiment with a safety cushion is a key
feature brought out in Premiere Elements: you can always experiment your way
into a mess, and then Undo your way back to safety again. And Elements also
includes the History palette from Premiere Pro for even more control for
stepping through recent operations.
Adobe also added buttons for the main steps in the editing process: Capture,
Edit, Effects, Titles, DVD, and Export. Behind the scenes, these actually use
the same Window / Workspace function that was already a part of Premiere Pro to
open and arrange the necessary windows for that step. But they now also update
the new How To palette to display immediately-accessible instructions on how to
perform common functions.
Meanwhile, the rest of the interface is real Premiere Pro, with all the menus
and most of the same functions. Some names have been changed to help new users
(Import becomes Add Media, the window fly-out menus use a more visible More
button), and high-end professional functions were simplified (one project open
at a time, stereo audio without surround sound, no separate Audio Mixer with
automation).
The Source and Reference Monitor windows from Premiere Pro also have been
greatly simplified into a single window that automatically switches between
clips and the timeline. This simplification also omits the Insert/Overlay and
Lift/Extract editing style and the cool video scopes. However, the Monitor does
still show the powerful split-screen views when editing adjacent clips to help
make exact frame-accurate edits.
So let's get started with editing by capturing some material from DV tape
over a FireWire (1394) connection. Click the Capture button in the task bar to
display the Capture window. Premiere Elements also displays information
on capture steps in the How To palette, which is fully accessible even though
the Capture window appears on top of the default layout of the screen.
 Capture window
The Capture window is clean and straightforward, with large video display,
VCR controls underneath to position the tape, and information displays above,
including a field to edit the clip file name. The window clearly displays the
current tape state: ejected, paused, capturing, and updates the capture duration
and remaining time in the available space on hard disk. However, it does omit
the logging and batch capture options in Premiere Pro, and the Project Manger to
trim and package projects and their media.
The depth of Premiere Pro also shows through in details like the time code
display area, where you can click and drag in the field to move naturally
through the tape, or type a time code value to shuttle the tape to a new
position. The VCR controls also include buttons to scan for the next or previous
scene, based on reading the time/date code stored on the tape. Single-letter key
press controls are also available to edit efficiently from the keyboard.
To start capturing, position the tape at the starting point and click the big
Capture button. Premiere Elements then does all the right things by default:
capturing the video, detecting scene breaks, splitting it into separate files
for each scene, and importing the clips into the project. You can click to stop
recording, or just wait for the end of the tape (but there's no option to set
the capture duration).
You also can import other media files into the Media window in a profusion of
formats, including AVI, Windows Media, QuickTime, and MPEG video. Besides DV
format for NTSC and PAL, Premiere Elements also supports a variety of other
standard and widescreen aspect ratio formats including D1/DV and anamorphic
film.
During capture, Premiere Elements automatically lays out the clips on the
Timeline, where they are immediately ready to edit after you finish capturing.
You also can drag clips from the Media window, or use the Icon view to organize
clips as a storyboard and then insert them in the timeline. Premiere Elements
also includes a new Slideshow function that lays out still images with the
default transition, and even matches audio beat markers in the timeline (this
works with video clips as well).
Editing in the Timeline window with Premiere Elements is a drag and
drop breeze, again leveraging the abilities of Pro. The default behavior is to
ripple edit, what Adobe calls "gapless editing" -- as you add and
delete clips, trim and move them, Premiere Elements slides the adjacent clips to
automatically fill gaps. Of course, you still can use the Ctrl key as a keyboard
modifier to change this behavior, with helpful tips displayed in the status area
under the window to remind you what action will be performed.
Premiere Pro's floating toolbar has been simplified down to three tools,
which are included at the top of the Timeline window along with the time code
and zoom controls. Use the Select tool to adjust and trim clips, the Razor tool
to split clips, and the Time Stretch tool to change speed and duration.
To trim clips, just drag one end of the clip; a split-screen view of the
adjacent frames is also displayed in the Monitor window. As in Premiere Pro the
cursor changes shape to indicate the current editing operation. However,
trimming can be confusing for new users: it can be tricky to select the right
element, especially when the Timeline is zoomed out, as the cursor flips between
the beginning and end of short clips, or if you accidentally select the
horizontal line to adjust audio volume without even understanding what it is
used for (but that's where Undo comes in).
Premiere Elements includes other editing convenience features from Pro, such
as the subtle snapping behavior when you drag clips and the playhead, and the
corresponding visual indicator when you have elements aligned on the same or
different tracks. Premiere Elements does support having only one project open at
a time (no nested timelines), but provides up to 99 video and audio tracks to
work with.
As you build up clips and tracks on the Timeline, you then can apply video
and audio transitions and effects. While this has the potential to get
complicated for new users, Premiere Elements provides the full Pro effects
interface: Use the Effects palette to drag transitions and effects onto
clips in the Timeline, and the Effect Controls palette to adjust the
effect's parameters, including adding keyframes. As another convenience feature,
you don't need to search through the folders in the Effects palette to find a
specific effect, you can just type part of its name (i.e., "blur") and
then immediately see a list of only the matching effects.
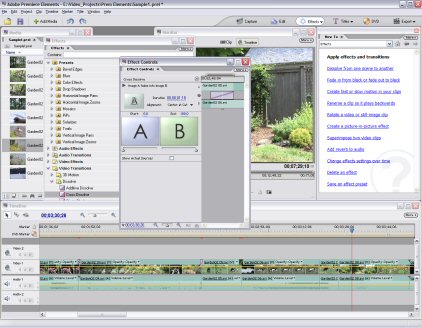 Editing Effects
To start working with transitions and effects, click the Effects button in
the task bar to re-layout the workspace with the Effects palette. To add a
transition, drag it from the Video Transitions folder in the Effects palette to
the boundary between two clips. The cursor changes to indicate if the transition
is to be applied across both clips, or to just the end of one of the clips
(i.e., for an easy fade out).
One problem for new users is that since Premiere no longer uses the A-B
editing display style, you cannot easily see how clips may or may not overlap
(there is a subtle maker on the corner of the clip to indicate when it has not
been trimmed). Premiere Elements displays a warning dialog if there is
"insufficient media" at the end of the clip for the transition, and
then automatically repeats frames if needed.
Similarly, apply effects by dragging them to the target clip. Premiere
Elements includes a Presets folder with filters and effects such as blurs,
colorizing, picture in picture, and image pans, including pre-designed animation
of motion through the frame. Or you can display the Effect Controls palette to
customize effects, including the built-in Motion, Opacity, and Volume, by
adjusting each parameter and setting keyframes. Premiere Elements also inherits
the Pro option of adjusting effect keyframes directly in the Timeline.
As you apply and preview effects, the Premiere Pro engine is humming
underneath so you can preview your edits in real time without rendering, and
take advantage of multithreading and hyperthreading processors. Premiere
Elements also includes a set of "GPU Transitions" including page curls
and rolls that are optimized for supported graphics chips. And you can preview
your edits live on a TV attached to your DV camcorder.
For creating titles and credits as slides or overlays, Premiere Elements
includes the professional Title Designer from Pro for designing static,
crawling, and scrolling overlays with text (and graphics). Or use the pre-built
templates, and more than 30 included Adobe fonts.
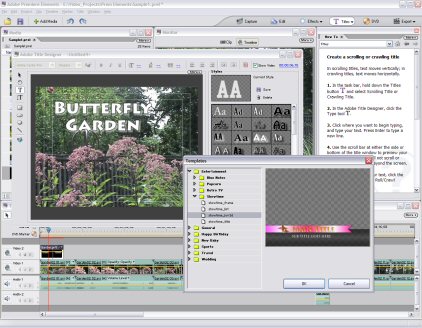 Title Designer
Without a lot of fuss, you've now edited a video production using Adobe
Premiere -- capture, timeline editing, transitions and effects, titles and
overlays. With some intelligent defaults, helpful presets, and How To guidance,
you've learned real video editing techniques that can carry you on a lot further
in the future.
You then can export your production directly to DV tape over FireWire, or to
a video file on hard disk in MPEG, QuickTime, and Windows Media formats. Again,
Premiere Elements provides presets for common formats, and Advanced options
including much of the gory format-specific parameters from Pro's Adobe Media
Encoder.
For export to DVD disc, Premiere Elements adds a significantly enhanced DVD
Layout tool. Click the DVD button to create a DVD from your project, either
as a straight video, or complete with scene menus. You can automatically create
chapter points for each clip (or at time intervals), or place explicit DVD
chapter markers in the timeline. Premiere Elements then generates a Main menu to
play the movie or display the scene index, and the Scenes menus with thumbnails
of each chapter point. You can change the template design for the menus (and
create your own templates with Adobe Encore DVD and Photoshop).
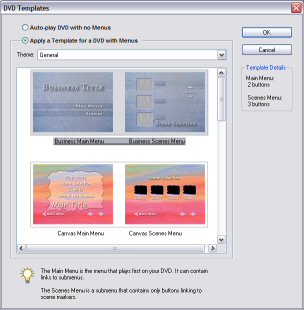 DVD Templates
Once the menus are generated, you can preview your DVD, edit each chapter
point to specify whether it appears on the main or scene menu, and change the
frame that is used as the button thumbnail image on the menu.
Finally, burn your project to disc (or to a folder on hard disk), with the
option to use NTSC or PAL television format. Premiere Elements will
automatically compress your video to the highest quality that will fit on a DVD,
or you can specify a general quality setting.
So there you go: you're up to speed creating and sharing video productions
with the advantages of a professional tool, but without the intimidating
complexity (or significantly higher price). With the Premiere Pro engine
underneath, you get the advantages of both the processing power (especially with
highly responsive skipping and stepping through the timeline) and the
well-designed interface (including keyboard shortcuts, pop-up informative
tooltips, and split-screen Monitor editing display).
Of course, the entry-level consumer tools are still your best choice if
you're primarily interested in quick and casual hit-and-run editing, where you
want to jump in every now and then and do some simple editing fast and easy.
In comparison, Premiere Elements is designed for those who want to start easy
and then grow. It's not so much stripped down and constrained in order to
simplify editing, as it is augmented with helpful defaults, common presets, and
handy how-to instructions. You can do mainline editing operations without much
fuss, and then always open the hood for access to more advanced options.
To put it another way, this isn't video editing on a tricycle, this is more
like training wheels on a racing bike that you can retract as you get up to full
speed. And, if you really take to the sport, you can always aspire to move up
someday to the majors with Premiere Pro.
Adobe - Premiere Elements
www.adobe.com/products/premiereel
|