Manifest Technology Blog
-- Site:
| Articles
| Galleries
| Resources
| DVI Tech
| About
| Site Map
|
Articles:
| PC Video
| Web Media
| DVD & CD
| Portable Media
| Digital Imaging
| Wireless Media
| Home Media
| Tech & Society
|
DVD & CD:
| DVD & CD Articles
| DVD Software Gallery
| High-Def DVD Gallery
| DVD Authoring Resources
|
Accessible, Professional DVD:
Ulead DVD Workshop 2 (7/2004)
by Douglas Dixon
Starting a Project
Capture
Editing Clips
Editing Tracks
Making Menus
Editing Menus
Finish Line
Working in the Workshop
References
Creating a DVD is a technically challenging task, much more complex than
dumping some uncompressed music tracks on disc to make an Audio CD. But what
only a few years ago required tools that cost multiple tens of thousands of
dollars is now available to consumers for under $100. These less expensive
"personal" or "automated" tools, like Sonic MyDVD (www.mydvd.com) and Ulead DVD MovieFactory (www.ulead.com/dmf),
simplify the process of making a DVD by automatically laying out a group of
clips into a menu structure, using template designs for the menu backgrounds,
buttons, and layouts. The result is a quick and low-effort path to get clips to
DVD. However, you do give up a lot of control with these tools, and your discs
end up with a similar design look.
As the DVD authoring software market has evolved, the next step in capability
is to "corporate" or "professional" tools in the $500 and up
range. These tools provide access to much more of the DVD specification,
including multiple audio and subtitle tracks and options for professional
manufacturing (replication). These tools also remove the constraints on your DVD
designs, providing the ability to customize the look and layout of individual
buttons and menus, and the navigational links between them.
The new generation of professional DVD authoring tools combine professional
DVD design features with built-in tools for menu design and video and audio
compression. These include Apple DVD Studio Pro 2 (www.apple.com/dvdstudiopro)
on the Macintosh, and Adobe Encore DVD (www.adobe.com/encoredvd),
Ulead DVD Workshop (www.ulead.com/dws),
and Sonic DVD Producer (www.sonic.com/dvdproducer)
on Windows.
 Ulead DVD Workshop 2
While most of these tools are designed for corporate design professionals
(i.e., following Apple or Adobe interface conventions), Ulead as struck a
different course with DVD Workshop. Priced a little lower (at $495 retail), the
new DVD Workshop 2, released in January 2004, provides almost all the same
authoring and DVD specification features, but in a more accessible, perhaps
"enthusiast" interface. With a full-screen window and bigger icons,
plenty of helpful prompts and pop-up tool tips, and an emphasis on thumbnails
and icons instead of text and tables, DVD Workshop provides a step-by-step
workflow that can be easier for getting started, and for coming back to for
occasional, casual use.
The first clue of the DVD Workshop design philosophy hits you when it first
starts up: DVD Workshop takes over the full screen (there's no option to resize
the window), with a soft gray look and friendly icons. A large Preview Window
holds the center of the screen, with play controls underneath. The rest of the
screen is blank, ready to be filled in with control panels once you start a
project. Along the top of the window are the tabs for the Step Panel, guiding
you through the process of creating a DVD: Start (new project), Capture (from
video), Edit (project elements), Menu (design and links), and Finish (burn).
On the Start tab, click New Project, and enter the project name, disc type
(DVD, VCD, SVCD), and TV System (NTSC or PAL/SECAM).
DVD Workshop then switches to the Edit tab and fills in the screen with the
controls you will use to build your DVD: the Library at the bottom left to
import clips, the Content Window along the bottom to add videos and images to
your production, and the Chapter List down the right side to organize chapters
within clips.
To author your project with DVD Workshop, you can add elements directly to
your project in the Content Window, or first import them into the Library to
organize and share between projects, or you can capture additional material
under the Capture tab.
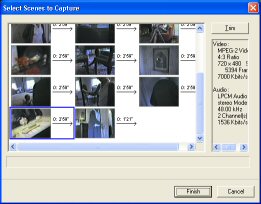 Select screens to capture
DVD Workshop can capture into AVI or Windows Media formats, or directly to
MPEG for DVD, VCD, and SVCD.
Under the Edit tab, you also now can use Import from DVD to import material
from a DVD folder (on hard disk or DVD disc). DVD Workshop displays a Select
Scenes dialog with a thumbnail list of all the clips in the folder. You then can
select scenes, and even trim them, and then import them into your project
(although Workshop got hung up during trimming when reading from a DVD disc).
Under the Edit tab, the Library organizes clips by media type (Video, Audio,
Image), accessed by the drop-down menu. DVD workshop installs with some sample
media, and you then can load your own assets into the Library to share among
your projects. DVD Workshop's fixed window layout is limiting when you add lots
of clips to the Library panel. It does scroll, but a better solution is to use
the Library Manager feature to add your own sub-categories for organizing
smaller groups of clips.
DVD Workshop now can import files in AVI, Windows Media, QuickTime, and
MICROMV formats, multi-layer PSD files, video from DVD-Video and DVD-VR discs
(not copy protected), audio from Audio CDs, and Dolby Digital AC-3 2.0 and 5.1
audio.
The Load File dialog has a nice Preview option to view clip files, and
provides an Info dialog for detailed information about clips. When loading
clips, DVD Workshop now provides automatic scene detection to scan DV clips for
scene changes, by DV tape time or from the video content. You then can join and
split scenes, but not insert them manually at this point.
 Edit tab
You then use the project Content Window panel along the bottom of the screen
to add clips to your project, to then link together using menus. You can add
clips by dragging from the Library, or import them directly from files on disk.
To edit a clip, double-click it in either the Library or the Content Window to
display it in the Preview Window. You can play through the clip using the play
controls and set In and Out trim points (although the video is very pixilated,
at least at my 1280x1024 screen resolution).
Use the clip Options Panel above the Library to add chapter points within the
clip, or use Auto Add Chapters to scan for scene changes (with the same dialog
used during import). The Chapter List panel down the right side of the screen
then is used to display thumbnails of the chapters. You also can select the
frame used as the thumbnail image.
In keeping with DVD Workshop's graphical interface, there is no timeline-like
display of chapter marks along the play control, although you can hover the
cursor above the chapter thumbnails for a pop-up display of the timecode. There
also is no indication (or detail view) in the Library or Content Window to show
information such as clip lengths or which clips have chapter points.
Similarly, you can create a slide show of image files by selecting a group of
images and dragging them to the Content Window as a new clip. DVD Workshop
displays each image in the Chapter List panel, so you can add, rearrange, and
delete the images in the list. And now you can apply some 100 different
transition effects.
DVD Workshop 2 now goes beyond basic DVD authoring by providing the ability
to add up to the DVD maximum of 8 audio and 32 subtitle tracks with each video
clip. Click the Audio tab in the Options Panel to add audio tracks, with
optional volume level, looping, fade in/out, and even a surround sound emulation
option. You now can adjust the audio level across all the tracks.
You also can use the Add/Edit Subtitles dialog to enter multiple tracks of
subtitles to have text appear at different points in the clip. You can type,
position, and format the subtitle text directly over the video background, and
save and import from text files. DVD workshop also now provides the ability to
create subtitles from information embedded in DV clips and image files.
You also can assign DVD language codes to the audio and subtitle tracks.
Once you have added all the video clips and image slide shows to your
project, created chapter points, and added additional audio and subtitle tracks,
you are ready to create the menus that will link these elements into the
navigational design of your disc. Not surprisingly, this is done under the Menu
tab.
When you switch to the Menu tab the screen areas take on slightly different
uses. The Content Window along the bottom of the screen now lists the menus in
the project. You then use the Chapter List down the right side of the screen to
access the available chapters from each clip in the project. You click at the
bottom of the Chapter List to step through the list of each clip, and the area
above then displays thumbnails of each chapter (in a clip) or image (in a slide
show).
 Menu tab
DVD Workshop provides three methods of creating menus: from a Blank menu
(starting with a background image), from a pre-designed Template (layouts with
backgrounds and thumbnail or text buttons), or from a Wizard. The Wizard steps
through selecting a group of clips, choosing a menu template, and then
automatically creates two kinds of menus: a linked series of menus with
thumbnails for a list of clips, and linked menus with thumbnails for chapter
points within a single clip. You also can choose the background image (or video)
and background audio track.
While this initial layout is automatic, DVD Workshop does not then re-adjust
the layout if you need to add or delete a clip; you seem to need to re-create
the menus again from the Wizard.
To edit your menus, use the tabs in the Options panel to edit directly in the
Preview Window. Choose a motion menu video background clip, and set the play
duration and loop point. Choose to have the button thumbnails also be motion
video, and design selection highlights for the button frames and thumbnails. The
menu editor also provides helpful overlays to show or hide object boundaries,
button information, and highlights. Enter text for titles or other information,
with extensive fancy effects (but be careful to make sure it is still readable
on TV displays).
 Menu templates
With new options for customizing your buttons, the Library includes a variety
of Button and Bullet designs, as well as Frame and Highlight Image shapes. DVD
Workshop also includes a variety of graphics objects, including General clip art
(globe, computer, watch), Bullets, Animated objects, and Menu Overlay effects.
For even more interesting menus, you now can create buttons that
auto-activate, so the button action link is taken as soon as the user highlights
it (with no need to press to select it), and even make invisible buttons for
secret "Easter Egg" options.
Finally, you can create buttons that link to a Playlist -- a list of multiple
clips to play one after another. In this way, you can re-use material on your
disc, both linking to individual clips to play by themselves, and also create
alternate links to lists of clips to play sequentially. You even can have the
playlist loop, and assign specific audio and subtitle tracks to be played.
The final step in using DVD Workshop is the Finish tab, which clears the
screen to display just a Preview window and DVD play controls. While you work in
the Edit and Menu steps you can preview an individual clip or menu at any time
in the Preview Window. DVD Workshop even impressively previews motion menus in
real time, with the video background, audio, and motion button thumbnails. But
that's just one clip or menu; the Finish tab lets you preview your entire
project, navigating through the menus and playing all the clips.
Once you are done checking your disc, you can burn it to disc. DVD Workshop
also can build your project to hard disk as DVD folders (to play with DVD player
software), or as a disc image file (to then burn multiple copies to disc).
To compress your clips, DVD Workshop offers a variety of pre-defined MPEG
compression templates (High Quality to Long Play, at 60, 90, 120, or 180 min.).
It also provides direct control over the compression parameters, with Constant
or Variable video data rate, and MPEG, LPCM, or Dolby Digital audio.
For professional duplication, DVD Workshop now permits specifying Macrovision
copy protection and Region code. The DLT Writer tool permits writing the project
to Digital Linear Tape for professional replication, including CSS copy
protection and DVD-9 dual-layer discs.
DVD Workshop 2 provides a friendly, accessible interface to the level of DVD
authoring capability typically required for creative professionals and advanced
enthusiasts. It combines template and Wizard-based approaches to automated DVD
designs with the ability to customize the details of menu and button designs.
DVD Workshop does go out of the way to provide a very helpful interface. When
you first switch to a new tab, it displays getting started information in the
Options Panel area, and a help balloon to describe the buttons above the Content
Window. (Although you have to manually click the balloon to close it; otherwise
other tool tip pop-ups appear underneath it.)
On the other hand, as with other Ulead tools, under the surface interface DVD
Workshop also does provide sophisticated features and detailed information and
controls for Advanced options. However, the terse manual and on-line Help are
silent on some of these features, and there are no links to on-line Help from
the dialogs, or even directly from the main window.
The other issue with DVD Workshop is that its graphical interface and fixed
window layout may be better suited for smaller projects, and become limiting
when used on larger projects (as you scroll through a horizontal row of
thumbnails of clips and menus, eight at a time). Similarly, there are no
mechanisms for making global changes such as updating menu backgrounds, title
fonts, or return links.
If you're looking to step up from the limitations of the simple
"personal" DVD authoring tools, and especially if you're looking for a
casual relationship with an easy-to-get-along-with authoring tool, then you
definitely should take a look at DVD Workshop. You even can check it out over
the Internet by downloading the trial version from the Ulead website. You'll
find DVD Workshop to be accessible, but surprisingly deep, and maybe worthy of a
more serious relationship.
Sonic - MyDVD
www.mydvd.com
Ulead - DVD MovieFactory
www.ulead.com/dmf
Apple - DVD Studio Pro
www.apple.com/dvdstudiopro
Adobe - Encore DVD
www.adobe.com/encoredvd
Ulead - DVD Workshop
www.ulead.com/dws
Sonic - DVD Producer
www.sonic.com/dvdproducer
|